|
Meeting Recorder
Plus – User Guide
Features · very
easy to use, “two clicks” recording · record
video and audio of any meeting, chat, or conversation (VoIP) programs · use
any kind of speakers and microphones, Windows internal, Bluetooth, USB, and
many others · advanced
Smart Microphone feature turns on and off the microphone, lowers or mutes the
speaker audio volume to minimize echo · automatically
detection and tracking the position of Zoom, Skype, and Google Meeting windows
· audio
setup using Windows · high
quality video recorder (1080p) can be used to record anything from your
screen · record
MPEG, WMV, MP4, extract audio recording in MP3 file · video/audio
converter included Version
3 adds
the following new features · Any
type of microphones and speakers can be used Any type of
microphones and speakers can be used besides the internal, Windows default.
Bluetooth stereo headsets like the Apple AirPods Hands-Free, monoaural
headsets like the Voyager series, different type of earbuds, USB microphones
and many others. · Speaker
sample rates no longer restricted Any supported speaker and microphone sample rates can be selected unlike
the previous version limitation to 48000Hz. · Speaker
and microphone not required to have the same sample rates Any available
sample rates for both the speaker and the microphone can be used. No need to
be the same. · Improved
echo cancelation with the Smart Microphone Speaker volumes are now automatically set when turning the microphone
ON or OFF. · Improved
user interface A lot more details about your system audio are shown. A better
troubleshooting and setting guide is provided. To setup your audio system for
recording all you need is to open the TEST dialog window. The system audio
defaults are automatically detected. Importanat: The remote audio stream picked up
from the speakers may be re-recorded through the microphone audio feedback
when recording. This leads to echo and distorsion. To minimize echo try to lower
both microphone and spekers volume as much as possible or use echo canceling
settings available in Windows 10, some Windows 7 versions and some sound
cards. Meeting
Recorder Plus will guide
you to setup these features if available. When neither one of these methodes works, use the Smart Microphone. Installing and first time running Meeting
Recorder Plus
should be installed on the administrator account however all clients get
shortcuts if the option “Make shortcuts available to all users” is checked
during the installation. Every user has his own recording folder and
settings. The administrator installation does not need to run in order for
the clients to run their versions. Only the administrator can uninstall the
program. When
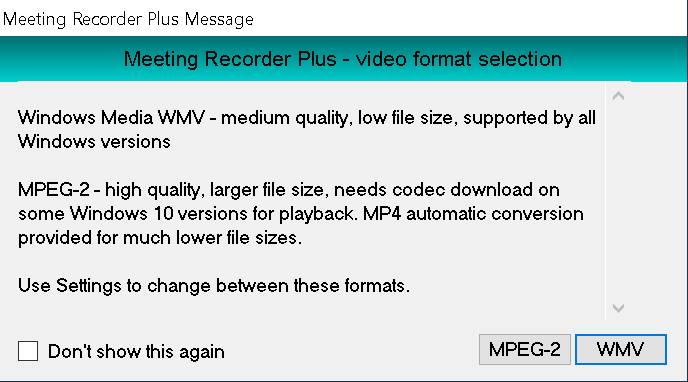
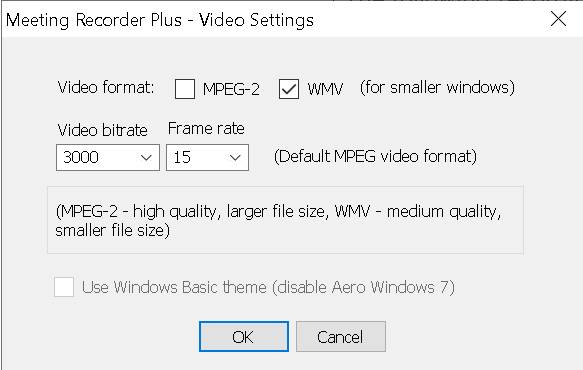
running the program for the first time you need to specify the following: Video format
used for recording
You can choose between WMV (Windows Media) and
MPEG-2. MPEG-2 is the preferred format because of its high quality video
recording and low CPU loading. It should be used with large, high motion
video windows. WMV format generates smaller size recorded files
with moderate video quality. All necessary codecs are supplied by Windows and
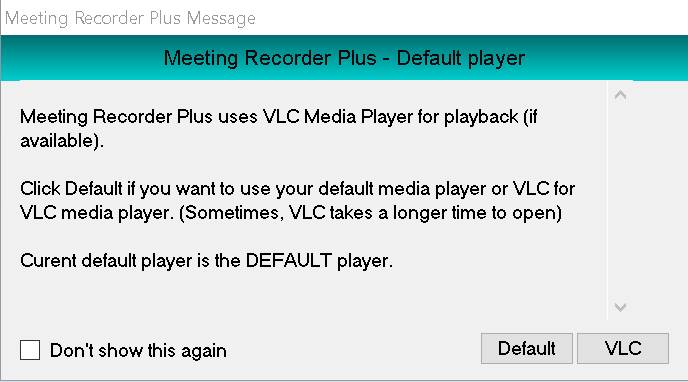
they may not be available in Windows versions installed outside USA. Video/audio
player used for playback
You can choose between your Default media player and
VLC Media Player. VLC is the preferred media player if installed. The default
player for Windows 10 (usually Movies & TV) may not always support MPEG-2
format however, it will provide instructions to install a free codec. Once these items are set everything is ready for
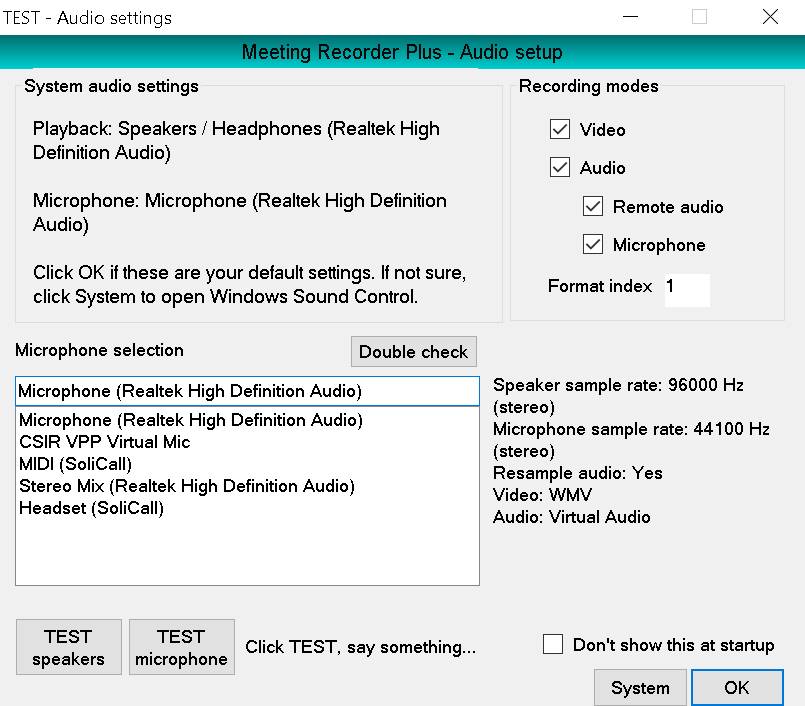
record. Your audio system settings including playback and recording devices
(microphones), sample rates, number of channels are discovered and displayed
in the TEST window that opens. The TEST Window
The TEST window
displays all the necessary information for recording the speakers (remote
audio) and the microphone (local audio). The default microphone is always
shown on top of the list and cannot be selected unless is the system default.
If the speaker or microphone are not Windows default devices audio resampling
is necessary indicated by ‘Resample Audio: Yes’. The recording video/audio
formats are also displayed. Different recording modes can be selected using
the checkboxes or the Format index. Test
Speakers by
clicking the button TEST speakers. Test
Microphone by
clicking the button TEST microphone, then saying something and listening to
what was recorded. Speak for at least 5 to 6 seconds. Some Bluetooth or USB
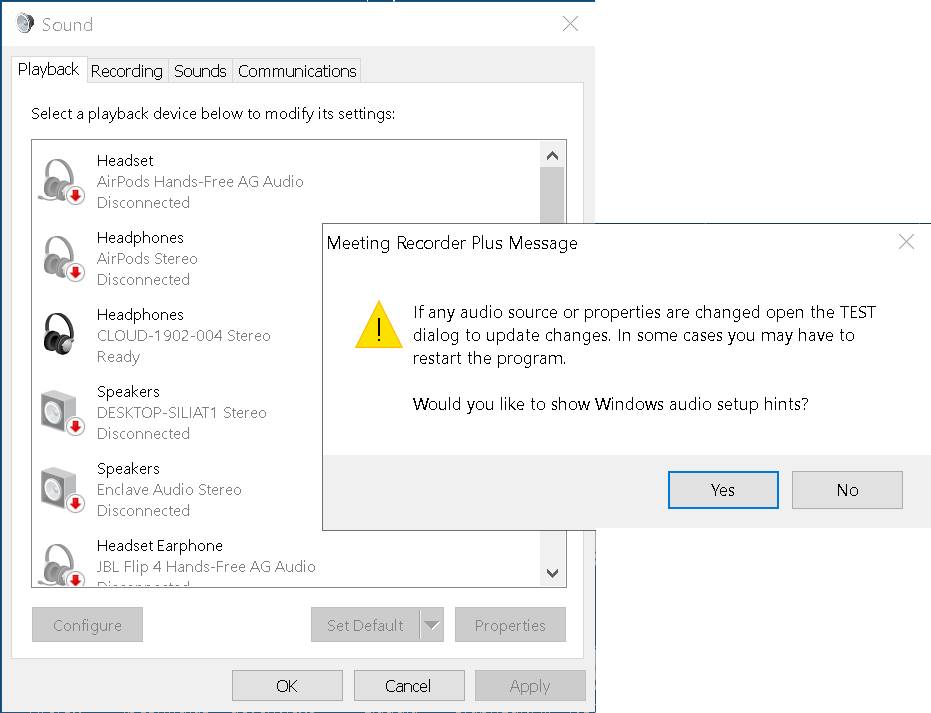
microphones may repeat the recording. System button opens the Windows Sound dialog (below) which
should be used to make audio changes. We recommend closing and restarting
Meeting Recorder if any changes are made.
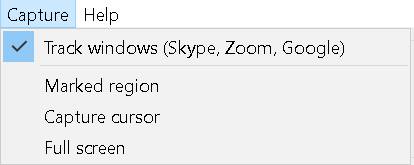
Video
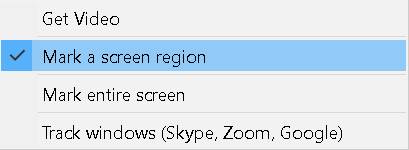
Capture Modes Click MARK to open the MARK menu (below) and
select how a video window will be marked and recorded on the screen. A
semi-transparent, resizable window is used for marking the recording area.
Get Video – automatic
detect and mark a motion video (does not work with static images). Mark a screen region - only
the marked portion of the screen is recorded and the VoIP windows are not
tracked. To mark a screen region click MARK, Mark a screen region. Mark entire screen - the
entire screen is recorded. Track windows – use
this option to enable tracking the position and size of the Zoom, Skype, or
Google Meeting windows. Marking automatically done in this case. Note that
tracking these windows cannot be achieved during recording. Recording
with Meeting Recorder Plus Meeting
Recorder Plus
clones the screen area marked for recording
and shows it on the main screen so you can always see what is actually
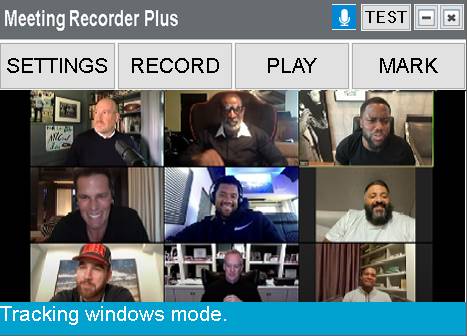
recorded. 1) Open Meeting Recorder Plus 1. The default capture mode is the “track windows”
mode. If either a Zoom, Skype or Google Meeting window is open Meeting
Recorder Plus will
automatically start tracking the window on your screen. The message “Tracking
windows mode” is shown. You can start recording right away. If these windows
are closed the entire screen is marked for recording. 2. If
neither one of the tracking windows are open Meeting Recorder Plus can
be used as a general, high quality
screen capture app. Click the MARK button
to manually or automatically mark the area of the screen to record. 3. When
using Meeting Recorder Plus as a screen capture program the message
“Screen capture mode” is shown. If you open a Zoom, Skype or Google Meeting
window and you need to track this window open MARK, click Track windows. 2)
Click RECORD to start recording. The RECORD button turns to STOP and the
PLAY button turns to PAUSE. a. Alternately,
you can use the hotkeys to start/stop, pause or control the Smart
Microphone recording. b. During
recording, the selected widows position and size cannot be tracked. 3)
Click STOP to stop recording. To playback the last
recording click PLAY. Main Screen functions SETTINGS
- open
the Settings dialog window. RECORD
- click
the RECORD button to start recording. When recording begins, the RECORD
button turns to STOP and PLAY turns to PAUSE. Click STOP to stop recording.
Click PAUSE to pause recording. Recording,
Pause, Smart Microphone can also be controlled using hotkeys that can be set
under SEETINGS. PLAY
- click
this button to play the last recorded video, View recordings, open the
Storage folder or setup a Storage folder. UNICODE is used to display any
language characters for file or folder names. MARK
- use
this function to manually mark a screen region or automatically find a motion
video window (Get Video does this). A transparent window rectangle is
displayed which can be resized or moved (grab the top of the transparent
window) to fit the screen area. When recording the Zoom, Skype or Google
Meeting windows marking is not necessary as Meeting Recorder Plus automatically
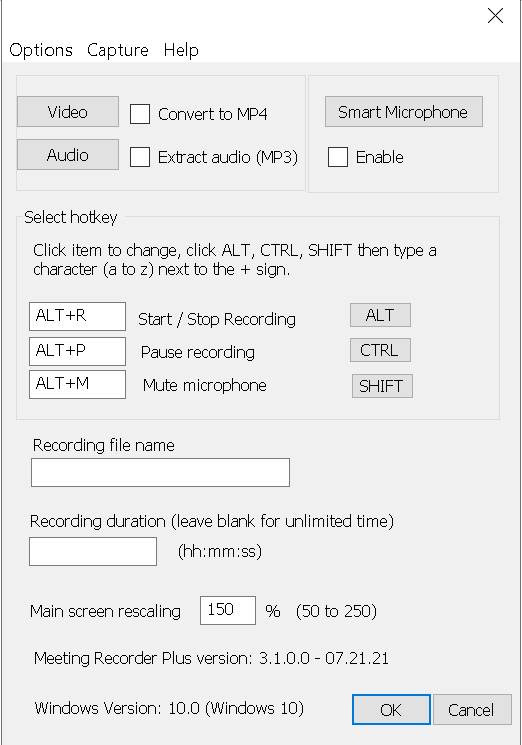
tracks these windows on the screen. The The Meeting Recorder Plus settings Click SETTINGS to open the Settings dialog
window.
Video – open the video format
selection and settings Audio – open the audio driver
selection Smart
Microphone - open Smart Microphone settings Select
hotkey for start/stop, pause, mute: Meeting Recorder Plus main screen
has a small print. It is also designed to clone the main video and show what
is being recorded. In most cases it should be left visible on the screen.
However you can use a hotkey to stop/start recording if the program main
screen overlaps the recording area. In this case the main screen is hidden. Recording
duration – use standard clock format hh:mm:ss. Leave blank
for unlimited recording time. Main
screen scaling: use this to make the Meeting Recorder Plus main screen
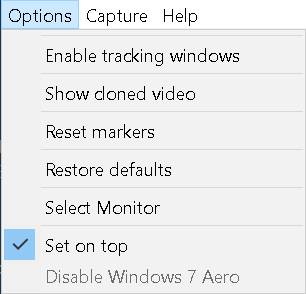
larger or smaller. Options Click SETTINGS
then click Options in the Settings
window to open the Options menu.
Enable
tracking – use
this option to enable tracking of Zoom, Skype, or Google Meeting windows. Show
cloned video - Show the cloned area of the screen to be recorded.
Reset
markers - Reset the marking window to the default position
on the main display. This may be necessary when a second monitor is turned
off but still connected. Restore
defaults - Restore setting to their original values when Meeting
Recorder Plus was installed. Video capture modes Click
SETTINGS then click Capture in the Settings window to
open the Capture modes menu (also available under MARK menu on the main
screen).
The
following recording modes are available: Marked
region - when
this mode is selected only the marked portion of the screen is recorded and
the VoIP player windows are not tracked. To mark a screen region click MARK,
Mark a screen region. Full
screen - the
entire screen is recorded. Capture
cursor – capture
cursor. Video
format settings
Video
bitrate: the higher this number (kbps) the better video
quality but larger recorded files Frame
rate: in order to lower CPU loading and file size use
smaller numbers (15 or 10 fps) Use
Windows basic - this mode lowers the CPU loading considerably (Windows 7 only) MPEG-2/WMV
- the recommended recoding
mode is MPEG-2 (see above) Audio
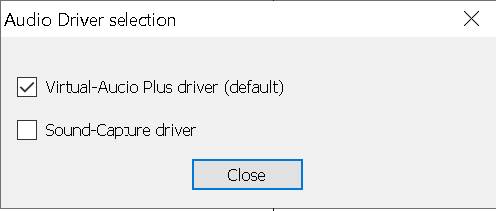
driver selection
Select between Virtual-Audio and Sound-Capture
driver. Virtual-Audio must always be used. Sound-Capture is still available
for backward compatibility. It can only be used with Windows default audio
devices and settings. Smart Microphone is an advanced feature of Meeting
Recorder Plus. It improves the quality of audio recording when
the computer microphone and speakers are used together. Here are the main
features and uses of the Smart Microphone when recording: ·
the ·
when clicking the Smart
Microphone button one or two beeps are generated to acknowledge the remote
microphone is ON or OFF ·
lower or mute the speaker
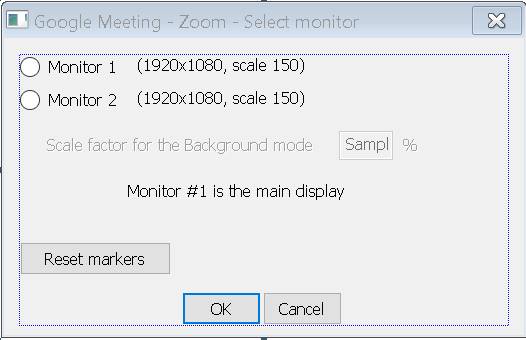
volume for the entire duration of recording Select Monitor
When using two monitors you need to specify the
monitor where the recording window resides. This is necessary if you are
using the ‘Marked region’ or ‘Full screen’ modes. Monitor
1, Monitor 2: Select the monitor where the video to be recorded
resides. Monitor 1 is always the main display regardless the monitor numbers
shown by Windows. When one of the auto tracking modes is used it is
not necessary to select monitors. Meeting Recorder Plus will track
the Zoom, Skype, or Google Meeting window on either one of the two monitors. You
need to select a monitor when the ‘Marked region’ or ‘Full screen’ modes are
used. Troubleshooting
1. Watch
the Meeting Recorder Plus status bar (shown above) after starting recording.
Following the video format (in this case WMV) you can see the recorded file
size. If this number is zero or does not change for a few seconds this
signifies a recording error. 2. If
a recording error occurs, first to check is the microphone selection. Click
TEST to open the Test window, click the selected microphone, make sure is the
default. If not, click System and set the default microphone. 3.
Same with the speaker. 4. If
speaker and microphone are OK, try to record again. If recording failure,
change the video format and make sure the audio driver is Virtual-Audio. 5.
Try to record Video and remote audio only (Format index 2) to identify the
source of the problem. 6.
Use Windows default microphone and speaker. 7.
For any speaker + microphone combination different than Windows default, the
Resample Audio (on the TEST window) must be YES. If not, you can contact our
customer support for help. |
||
|
|